Thursday, January 26, 2012

Tuesday Tutorial Part 2: The sewing of the boys pants

If you missed the tutorial on cutting the pieces for these pants, just go to yesterdays entry and read all about it ;)

Today we assemble the pants!
Are you ready!
It's really easy.. really it is!!

First things first... You want to make sure you have all your pieces.
You should have the following:
~2 front pants panels
~2 back pants panels
~4 denim semi-circles
~4 cotton woven semi circles
~back pocket piece
~front waistband piece
~back waistband piece

am I missing anything?
I don't think so.. lets get going!!

First we will put the front of the pants together and a good place to start is the front pockets.
You will want to take the denim pieces and the cotton woven pieces and put them right side together.
Like so...
             The lines I drew on the pockets are where you want to sew a straight stitch.. only sew on
                                                                     the two curved lines.

So here you have the two front pocket pieces, right sides facing each other and ready to be sewn.
Sew your straight stitch following the two curved lines I drew. Back stitching at the end of each to hold them securely in place.
Your next step, after sewing the pockets, is to turn them right side out and iron them flat.
                                    Here is one right side facing out and one still inside out

If you plan to add little tags to the pockets, now is a good time to do that.
I have lots of cute little tags and I LoVe to add them to anything I can get my hands on.. I mentioned in my Part 1 tutorial on where I get my tags, I even provided a link so you can get some too!!!

 I used a stitch similar to the Blanket edge stitch to sew my flat tag on (The Cassette tape tag) and then just stitched the Nerd tag under the pocket when I attached them to the front of the pants.
Here is what the Blanket Edge stitch looks like on your machine, no worries if you do not have it.. just a simple straight stitch will do fine :)

                                                      I used stitch number 14 on my machine
                                     Here is the tag sewn on and what the stitch looks like complete

Ready to put the pockets onto the pants?
Lay both front pants panels with the right sides facing up and position the pockets so you have a little bit of the edge over lapping the edge of the panels. This is so you can be sure to catch both layers of fabric when you are sewing the front panels to the back panels.

You want the pockets to go over the edge on both the side and the top of the panel.
Pin them in place and don't forget to add your little hang tag in if you want it..
 Now to sew on your front pockets you ONLY sew the outer most curved edge, no need to sew the top or sides just yet as they will be sewn in place when the front and back panels are attached.
You can use a decorative stitch or a plain straight stitch. I used a straight quilting stitch to add a little pop to the pants.
                      Above, pockets are sewn in place catching my cute little tag on the way through
                     Below you see that only one edge of the pocket has been sewn leaving the rest open
Now that we have pockets we can move onto those semi-circles at the bottom of the legs.
This is simple.
Just lay them in pace with the denim piece under the cotton piece. You still want the thickness of the denim in the jeans but want to add the funk of the cotton piece.
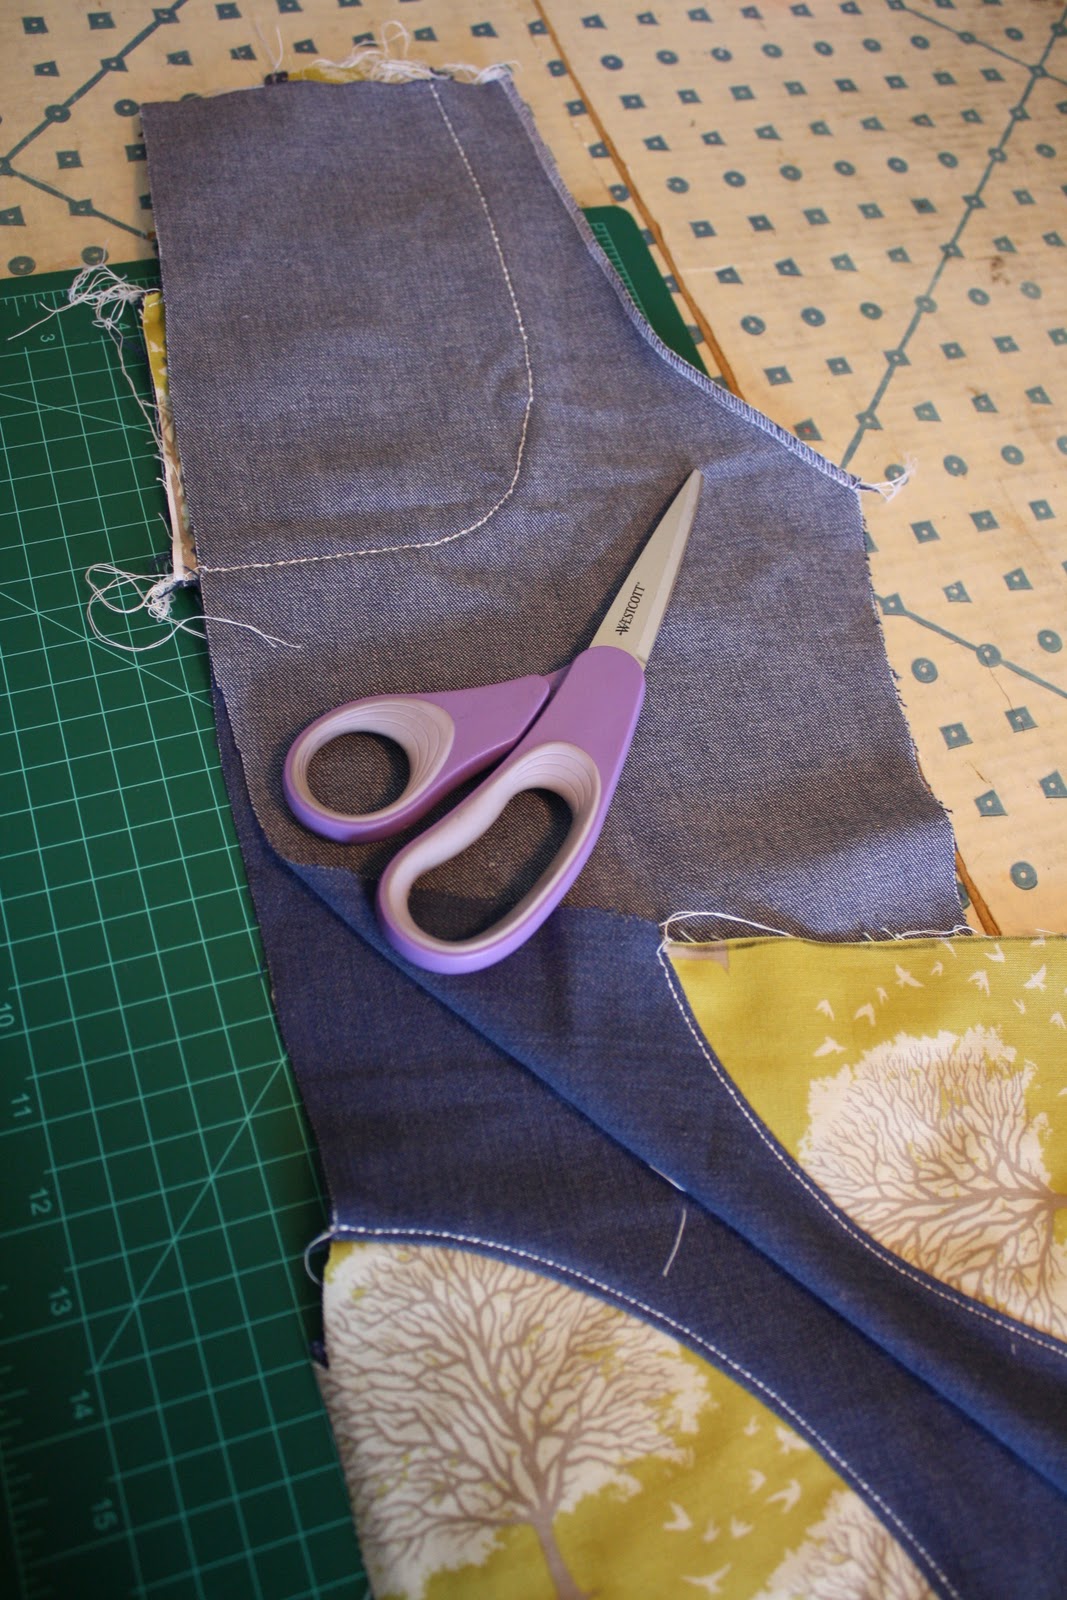
Lay them right sides together and sew into place starting at the top of the curve and working your way down to the bottom of the leg. If there is any extra just carefully snip it away. I had about 1/4" left at the bottom of the leg and just snipped it off, no big deal.

Above, before being sewn in place
                          After being sewn in place, no worries if you don't have a serger as a zig
                                                         zag stitch will do the job just fine

Iron the semi-circles flat and top stitch them in place using the same stitch that you used on the pockets.
                                                                    Iron them flat

                                                                   Top stitch along edge

                                                                   Finished semi-circle

Are you still with me?? ;)
We are almost done with the front and the back is fast and simple!

Next step is to sew the front panels together.
Lay them right sides together and sew ONLY the crotch curve, my scissors are pointing to where you want to sew.
Last piece to add to the front is the waistband.
Take your front waist piece and fold in half , turning it from the top, and iron flat
Iron flat (ignore my awful June Taylor board... I have had it forever...)
Lay raw edge of waist piece to top edge of pants and stitch into place

Turn up and iron flat.
Top stitch the seam and if you want to add a button like I did, do so now.

There you go!!!
Front panel finished!!
Marvel at your work for a little bit and then read on to assemble to back.
<3


We will start the back of the pants by adding the back pocket.
Take the piece that you cut for the back and either finish the edge with a serger or a zig zag stitch.
The picture shows two pocket pieces but I only ended up using one

Turn pocket over and turn down the top 1/4" and iron flat

Turn down the top another 1/4" and iron flat again, hiding the finished edge

Stitch into place using a simple straight stitch or a decorative stitch.


Turn in the remaining edges 1/4" all the way around and iron flat

If you turn the pocket over and compare to my unfinished one.. it should look similar to this. You can clearly see the size difference

Pin securely in place and stitch using the same stitch used to sew down the top


Finished back pocket!!!


Next add the semi-circles using the same method used to attach the front ones.

Attached to the back panels.
Iron them flat and top stitch.. same as the front


Lay back panels down, right sides facing each other and sew the crotch seam only. My scissors are pointing to where you should sew

Take your back waistband piece and fold in half, turning the top down just like you did for the front.
Iron flat

Again, you are going to repeat the step used to sew on the front waist piece.
Lay raw edges together and stitch in place

Lay and iron the waistband piece flat. Top stitch same as you did with the front piece.


Now you want to add a piece of elastic to the back piece.
When you folded it over and attached it to the back panel you created a casing to hold the elastic.
Cut a piece of elastic that is approx 3" shorter that the back of your child waist. Mine was 13" but I will end up loosing another 3" once it is sewn.


Put a safety pin in one end of the elastic and start to feed the elastic through the casing.
Once you get to the end of the elastic (which will not reach all the way through yet) sew a stay stitch to hold it in place.


Continue to feed the elastic through the casing until it comes out the other end. Pull to create a scrunch in the back of the pants. I ended up with about 3" of elastic sticking out the other end
Sew across the elastic to hold it securely in place
Snip off any excess elastic and you have completed the back of the pants!
Completed back panel

Completed front panel


Lay the two panels together, right sides facing and sew down each side and up each leg through the crotch. Serge or zig zag stitch to add more stability to the jeans.
Turn them right sides out and turn up the bottom of the leg about 1/4" and stitch that into place as well


... And you are done!!!!
Did you make it??!!
If so I want to see!!!
Here is my little guy proudly showing off his new DuDz!!


If you made it this far.. YoU RoCk!!!!
<3

Tuesday, January 24, 2012

Tutorial Tuesday! Boys pants part 1, the cutting of the pieces

Here is Tutorial numeral Dos!
This makes me happy!
These pants were super simple to design, cut and assemble. Feel free to ask any questions!

I wanted to go with a simple {enough} design for my 4/5 year old son. Easy elastic waist with no zippers, buttons or snaps. He will come up to me atleast 5 times a day asking for help with his pants.
These will be quite liberating for him ;)

Here is a quick shot of the finished pair... CuTe!!
You certainly do not have to go into as much detail as I did... but if you know me then you know that that's my thing... I like little tags and do-dads and stuff.
My tags are from Night Owls Menagerie . Her prices are FaBuLoUs and so are her products!!

Ok.. so lets get started. This is going to be a little longer than the last tutorial BuT well worth it!!

To make this simple pair of boys pants you will need the following:
~ a pair of pants that your little one already has (pull on style used for this tutorial)
~1-2 yards of a nice denim fabric (1 yard for sizes 2-5 and 2 yards for 6-8)
       Please not that you can use any bottom weight fabric, corduroy, twill or even recycled denim!
~1/4 yard of a nice quilter cotton in a design your little one likes
~12" of elastic that is 1" wide
~scissors
~coordinating thread
~a nice matchy button
~a fabric marker or pencil ( I use a charcoal pencil, one that artists use.. LOVE)
~sewing machine
~ serger is optional

First things first. You want to trace the pants that you already have. I can sketch up a pair of pants pretty easily, only using measurements... but I used the pants here as a visual aid for you. Super simple and once you do it a few times you too can be a pro ;)

Fold the pants in half , front facing out, and lay them on top of your denim.
The denim is folded in half, wrong sides together, so that when I cut one piece I am actually cutting both front pieces at the same time. Pretty handy trick.
                            Notice I went a little large, that is my seam allowance.. meaning the space I give
                                                                           myself to sew.

Once you trace the front pieces, fold the pants with the back facing out and do the same. I went right next to my front pieces to reduce waste.


If you did it correct you will end up with something like this
Go ahead and cut both pieces out, remember that the denim is folded in half so you are actually cutting TWO opposite pieces.
Here is what you should have once you cut them out


Next step is to cut the half circles from the bottom of the legs. Adds funk. I like funk.
Simply draw a 1/4 circle on the bottom of one of the pants legs like so..


Cut the piece (remember we are cutting both fronts at the same time) and put it on the back leg pieces and trace to cut an exact replica. You will end up with this..
     I am going to add in quick that I marked and F on the front pieces of my pants and a B on the back
                                                       pieces as not not mix them up

Take those pieces and trace them onto your printed quilters cotton to get 4 more of the semi-circles
Cut them out and you should have the following pieces
~2 front pant panels
~2 back panels
~4 denim semi-circles
~4 printed quilters cotton semi-circles


                                   Front panels are on the left and back panels are on the right

Next up are the front pockets.
I don't know about your 4 year old.. but mine LoVeS pockets and all that you can stuff into them
Pockets are a must have on our pants.
I am going to do the simple version of pockets.
Yes.. they are simple ;)
Take your back panels and fold them together and set them aside for now. We will be working on the front for a little bit.
Lay your front panels down and grab some of the denim that is left over after cutting the pants.
Put the scrap denim, right sides together, down on the pocket side of the panel.. like in the picture.
Then you simply draw a pocket similar to mine. We will stitch it right to the front of the pants so be creative, leave an opening for the hand.. other than that you can go square, rectangular or curved like mine.


Cut that piece out and put it on another piece of scrap denim to get the opposite pocket. In order to do this correctly you need to put the piece right side to right side (or wrong side to wrong side)
I hope I am not confusing you.. please ask questions if I am :)
Your piece should look like this
Trace and cut so you have two denim pocket pieces, opposite from one another.
Then do the same thing with the quilters cotton, you want two pocket pieces from that as well.. opposite from one another.

When you are done you should have 4 pocket pieces, two opposite denim pieces and 2 opposite cotton pieces. If you want to do a rear pocket they are also super simple. I gauge the size by using my hand and just cut a piece that looks like a typical back pocket.. my hand fits in the piece. Here is an example.

The last two pieces that need to be cut are the waistband pieces, tomorrow I will show you how to assemble all of them.

For the front waistband you want to measure across both pieces. Mine was 11" so I cut a rectangle that was 12" long by 4" tall.
My back panels together measured 15" so I cut a piece about 16" long and 4" tall.
Here is a  picture of those.
Remember to measure twice and cut once.
Tomorrow we will assemble the pants! See you then!!

Tuesday, January 17, 2012

Tutorial: How to do a Reverse Applique

Here it is!
My first TuTe-DaY tutorial :)

I am new to the whole tutorial thing so feel free to ask questions if I don't explain it thoroughly enough.

Today's tutorial is all about the Revers Applique. A super simple and Super fun way to jazz up those plain old tee's that everyone has laying around.
No serger required either!
All you need is:

A plain shirt (or hoodie, pants, skirt, etc...)
A design from an old tee that will fit on the intended finished product
Scissors
thread
sewing machine
Straight pins

For this project I took my sons plain H&M long sleeved tee (on right)  to applique and a men's tee (on left) with a design I likes for the applique


First things first, make sure your design is small enough to fit on the shirt you want to applique. Silly... but sometimes overlooked (I know this from experience)....

Cut the design for the applique out leaving 1/2 inch around the design and position on the tee.

Then you need to turn the tee inside out and place the applique face down on the tee, keeping your original position in mind.  Pin applique securely in place. I tend to over pin but better safe than sorry I guess ;)
So here we are with the tee inside out and the applique face down. ^^

Next take the tee to your sewing machine and stitch a simple straight stitch all the way around the edge of the applique.
After that step you are almost done!
Next just remove all of your pins, snip your threads and it should look like this
Turn the tee the right way and you have this

Give the fabric a pinch to separate the tee material from the applique

Snippity snip a little hole in the center of the sewed area and trim all the way around the sewed area leaving about 1/4 inch of the tee material, revealing the applique.


Then Viola you have done the reverse applique!!

aaand in the process you have made some little dude (or dude-ette) VeRy happy!

Don't forget to do something for yourself too!!!
Here is a skirt I did of mine :D Me LiKeY!!!

So go on now!!! GO sew!!!
<3 <3

Saturday, January 7, 2012

It's been awile!

WoWza, has 7 months really slipped by with me neglecting to post.
My apologies ;)

2012 is already off to a start and I am feeling the need for change.
I suppose that comes with the season.
None the less, I am feeling the need for change.. even a little bored and un-challenged.

I decided the best way to go was in my work. My passion. What I usually thrive for was feeling grey and dull and that left me feeling very uneasy.
I wasn't feeling the drive to get in my creative element and make new.
Maybe it was the overwhelming desire to buy new fabrics. If you are a seamstress you can relate.
Fabric is yummy, there is no doubt about that.
So are donuts...
Too much can be a bad thing and I was feeling bogged down with it.
Guilty for buying so much new when my original plan was to recycle. Make new from the unwanted/ old. Bring things back.
My love for fabrics can still flourish there.
I can walk into any thrift store and look right past ugly, out dated clothes and see the fabric screaming to me "Help!"
I cant stop myself.
I run to it.
I want to turn it into somthing. Anything. Save it, in a silly way.

I wasn't far from my original plan, I justified it by recycling t-shirt.
That's good, but not what I want.
I mean sometimes. Sure. I love making thse fun little twirly dresses. I plan to offer a few custom spots in my store and even make and stock them for Etsy. You can count on that.
But I dont want to be drug down by them. I want to pick up some old drapes and make a killer handbag with reclaimed buttons on it and baubles from who knows where. Somhing nobody else makes. SOmthing One of a Kind.
For you, your home and your children.
I will let my creativity go and just make.
Paying special attention to every detail untill the item is exactly what my minds eye pictured.
Somthing I can promise you will like ;)

So please stick around!
I plan to activly Blog and share tutorials. Anther thing I wanted to do from the start and plan to stick to. Once a week is my goal and I am starting next week with a tutorial on how to do a reverse applique. Super simple and will DuDz up anything outdated in your closet.

Monday, June 27, 2011

Whats your talent?

I have been thinking a lot about a new contest for my Facebook page that would get people thinking and doing... and doing and thinking.
"You are so talented"
I have been hearing that a lot these past few months and as good as it makes me feel (I really love hearing that from happy customers!) some of the people have also said "I wish I had a talent".
As much as I love hearing people say how much they love my duds.. I can't stand hearing people say that they don't have a talent.
I think everyone has been gifted with some sort of  talent. Everyone. It is just up to the individual to recognize it, mature it and put it to good use!

This leads me to my contest.

OK, lets start with the prize.. shall we!?
I am willing to give away anything listed in my Etsy store, any one item (some listings have two items in them and they are available too!) to the winner. I have lots of custom spots so there should be something for everyone. Think gifts too! Christmas is only 6months away (is it sad that I am already preparing for the Holidays..lol)!

Now on to the contest... whatcha gotta do to win the prize..
I am looking for you to tell me what your talent is and if you can, show me a picture of what you do or a picture representing what you do. Be creative.
Post them on my Facebook Page here and then come to my blog and comment under this post that you have "done" so.
I am going to give you until I reach 1600 fans to do so!
That means this.. if I have 2 or if I have 20 entries once I reach 1600 fans on Facebook I choose a winner.  No matter what!
Sound good?

Please only one entry per person but DO get as many people as you can to LIKE my Facebook  page.

Thank you and GOOD LUCK!
PLEASE ask questions if you don't understand any of this mumbo jumbo ;)