Wednesday, February 29, 2012

Tutorial: Fabric covered picture frame! No SeW!

Yay for getting another tutorial done amidst the chaos of it *almost being the show dates for the kids play!
We are SeW excited about it and have been working very hard.

This tutorial was a fun and much needed break from my everyday grind, I hope you try it and enjoy it!

For the past year (well.. more than a year but we will be nice and go with year ;) my husband has been working on the remodel of our daughters room
We have 2 little ladies. An 11 year old and a 4 year old.
We are very lucky as they LOVE each other. My older daughter thinks the younger one is "cute" . I am sure that will change.. ha ha ha... we are almost ready to get them both into the finished room.
As creative as my husband and I are we came up with some pretty fun stuff.
I plan to blog about every step of my decorating of this room.
Starting with the little odds and ends I am making to decorate.
I found a big batch of blank, wooden picture frames at the thrift store. Two batches actually. Once set of 5 from Wal Mart and one set of 6 from Ikea.
They are frames for 4x6 pictures and will look adorable in a cluster on the wall.. except not as boring old wooden frames. I needed to think of a way to jazz them up.
Again.. I started this tutorial as I do my others. Running around my house gathering odds and ends that I can work into my project.
Fun stuff! I always end up finding stuff that makes me think "That's where that went to!"


I ended up with:
 ~Fabric scraps
~My pinking shears
~Mod Podge
 ~a frame.. of course.. and
 ~A brush to apply the Mod Podge


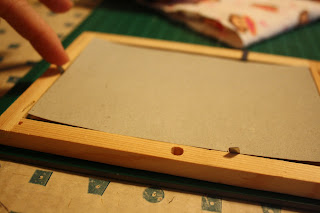
Turn the frame over and lift the little prongs to remove the cardboard and glass


Take your fabric scraps and cut them into smaller shapes. I like to use oblong pieces that resemble triangles and rectangles. All pieces are under 2" in size. Any larger and they become hard to work with.


Apply a liberal amount of Mod Podge to the front of the frame. I use a good amount to get the fabric nice and soggy so I can manipulate it onto the frame better.


Now is where we start to play Tetris a little.
You want to fit the fabric pieces all on without making it too bulky. You want to cover all of the wood with minimal overlapping. That way.. when you are done.. the glass and picture all fit in the frame again in the end.

After you fit your first piece on you add more of the mod podge to the top. Enough to create a milky like appearance to the fabric.
Mod podge dries clear and relatively quick. By the time I got all the way amount the frame I was able to hold where I started. It was dry pretty quick.


Keep on piecing and piecing all the way around the frame. Be sure to get the inner lip and the outer edge.


More pieceing...


Sooner or later you get ell the pieces perfectly in place and will have somthing similar to this (above)
Being that it dries quickly.. you can now take a 10 minute break..


I had to add an extra step in here..
I am pretty sure I *always* add an extra step..
Sorry.. lol.
I LOVE love love Tulip brands Diamond fabric paint. It is perfect for glittering over dried mod podge.
I used it to add sparkle to my frame too :)

I used a liberal amount of this also.
Apply from tube directly to the frame and spread with a brush.. try to be even and apply everywhere.

This stuff should also make the fabric appear milky but will dry clear and very sparkly.


Add an adorable picture and you are GooD tO gO!
Hope you will try it!!

Tuesday, February 14, 2012

Tuesday Tutorial: A Fabric Flower

Here it is again! Tuesday!
I can hardly keep up!
As I promised.. here is another super simple tutorial!
A fabric flower!
Make a dozen and put them in a vase!
Here are the items you need to make this flower.
~Felt
~Fabric scraps
~Pinking sheers
~Tacky fabric glue
~a dowel that is about 8-12" long
~Embroidery thread
~Darning needle
~Buttons (2)

Start by cutting circles.. lots and lots of circles.
You will need to cut to larger circles from the felt. Both circles the same size.
Using the felt circles, trace and cut 10 more circles from one piece of fabric.
Or.. mix them up! As long as you have 10 fabric circles that are the same size as the two felt circles.
Next you need 10 more fabric circles in a slightly smaller size than the first bunch.
After the next 10 are cut you want 10 more circles .. again slightly smaller than the last 10 you cut.

Once you are finished cutting you should have 32 circles.
2 felt
10 large
10 medium
10 small.

This flower is simple simple....
Take one felt circle and lay a large fabric circle on top of it.  (below)

 Take another large circle and fold it in half so the design of the fabric is on top.


 Fold that same circle in half again....


Lay the circle that you folded onto the large circle with the felt.
(Below)


Thread your darning needle with the embroidery thread and tie a knot at the end.
Run it up through the back of the felt and through the tip of the folded circle.

Bring it back down through to the back of the felt again and then add on another circle the same way you did the last.


Fold the second circle the same way you did the first, into quarters and sew on!

Keep going until you have used 5 of the 10 large circles. You should be a pro at this by now!
Below is what it should look like when done!

Set aside the remaining large circles and grab 5 of the medium sized circles.
Lay one flat on the large circles..

Grab another medium and fold the same way as the larges... sewing it in and going all the way around Exactly like you just did with the large circles!


Once you are done you should have something similar to this!

You can probably tell me what is next.. but I will humor you.
Grab your small circles (5 of them) and follow the last step! Lay one flat, fold and sewing the next 4 into place!

Give the *almost finished flower a little fluff and set it aside.
Grab the second felt circle and start at the beginning again. You need to make to make the other side of the flower..

All that hard work pays off in the end because you now have 2 fabric flowers ;)


After you have finished both of your flowers you want to attach the buttons. You can sew them.. but you can also glue them. Aileen's tacky glue dries quick and I love it. SO that is what I used.
I put a generous amount around the button and plopped it right on the first flower.

 See... *plop*
Repeat with the second side of the flower.


Our trusty tacky glue comes in handy once again.
Cover the back of both felt pieces with tacky glue.. enough to hold it nice once it has dried.


Place the dowel in the center of the felt circle like so..

Sandwich the dowel between the two felt circles and let dry
Drying only takes about 10 minutes.
Then pick it up and give it a fluff!


I wrapped a cute bit of lace up the dowel to add some pretty to it and then it's done!

these are perfect for decorating a little girls room! Use scraps from the bedding fabrics and lake a few dozen little flower, recycle something awesome for a vase and you are set!!

Thanks for reading!!!

Thursday, February 9, 2012

New Item Reveal!! Recycled jeans.. Boutique style!

I have been bursting at the seams (ha ha) with new ideas and decided not to wait another minute to get this one out of my head and plans made up!
I took a regular pair of jeans and fancied them up all DuDz like!
I also made a cute little pheasant style top to match!
Tell me what you think!
Please note that in the picture only one leg of the pants has been finished because I want to you see the before and after.


I plan to offer these in my store soon but first want to offer a few "tester" spots to my fans!!
A set price on these outfits has yet to be determined.
I am going to offer the jeans for $25 to the first four people that request them.
You tell me size (12mos to 12 girls) and favorite colors, characters, styles, sports etc.. I can do them in boys or girls.
Payment must be made in full for order to count and I will send a feedback sheet for you to fill out. Once that sheet is filled out I will refund you  $5! That will bring the total down to $20 for a custom pair of recycled jeans!
I can offer up a pheasant style top or appliques tee for an additional $20.
Remember.. only the first 4 to order and complete payment will qualify for this special <3 <3
Here are a few more pictures!


To get in on this limited deal please go to my Facebook page and comment under the link to this blog post <3
https://www.facebook.com/#!/pages/Katies-DuDz/295074502882

Tuesday, February 7, 2012

Tutorial Tuesday! My Fabric Valentine

Happy Tuesday all!
The tutorial today is a really simple one
I know I have said that before and they end up taking two days to complete (remember those boys pants.. Ha!) But for real.. this time it is quick and easy.. and everybody LOVES a handmade Valentine!!
I used stuff I had laying around the house.
You will need some sort of the following:
~A heavy weight fabric like canvas, denim or corduroy
~Scraps that make you think Valentines
~sewing machine
~heavy fusible webbing like Steam a seam or Heat N bond
~Fabric paints
~Stamps (optional)
~ribbons, buttons or other cute notions (also optional)
~Iron
~scissors

 I think that should do it. I have other ditties in the picture that I didn't end up using.. no biggie. I just ran around my house for 10 minutes looking for stuff I could use up and this is what I found


I had a ton of larger index cards laying around so I used those for my template.
I first traced the size of the index card onto my canvas piece and cut out two of the same sized rectangles.
I then used the same index card and cut it in half. From one of the halves I cut a nice little hear to use as a template for my reverse applique that I plan to add to the front of the valentine.
Remember how to do a reverse applique? If not.. no worries. Go to one of my earlier tutorials and read how ;)


You can toss both of these pieces or hang onto them for future projects but from here on out you don't need the templates anymore.
Grab a few pieces of your scrap fabrics for our next step.
You want to arrange them so when sewn together, the heart template fits on top. There is no need for these to be perfect in any way... just big enough to fit the heart is all!
Trace the heart onto the back side of the fabric and then cut it out...


Place the heart face down on the back side of the card front and pin securely into place.
Make sure you have planned out how you want the card to open. You will be quite upset if you have figured out you make the card to open backwards... I was ;)
Now you follow the same steps as the reverse applique. Sew all the way around the heart and then cut the front fabric away revealing the design. Remember to leave 1/4" of the fabric all the way around on the front. It will frey a little and give it a great look.

After the heart is revealed you want to cut a piece of the fusible webbing the exact same size as the canvas pieces ..
Place the webbing on the back side of the card and iron on. Once cooled peel the paper backing away..
Lay the other canvas piece on the one with the webbing and iron into place.  You should have sandwiched the webbing in between the two pieces of canvas, fold in half and iron so the fold in prominent and the card stays folded once you lay it down. I even went as far as to sew a decorative stitch down the fold to hold it in place.

Trim away the strings and get ready to stamp the inside of your card.
You can just use fabric pens from here on out and write a cute little message but I love stamping on fabric so I had to add one more step to this.
I found a cute stamp that reminded me of my oldest daughters teacher so I went with that one.
I used Tulip fabric paint, a sponge stamper.
I first added some of the paint directly to the sponge dabber.
Dab it directly onto the stamp, making sure the paint is spread evenly..


 Press firmly down onto the canvas making sure to get all of the ink onto the card.. and Presto! You have made a fabric card!!

You can keep going from here and make it as personal as you want it to be, letting you kids sign their own names and add a little message to their teacher is a great touch!

Enjoy and as always.. feel free to ask if you have any questions <3 <3